Your Guide to Wella’s Hair Color Charts
If you spend more time sitting in the salon chair than you do coiffing hair behind it, you might think your colorist simply glances at a color chart before choosing your next ultra-flattering shade. However, there’s a lot of knowledge behind every formula they mix, even if they make each decision, suggestion and technique look utterly effortless.
And, while we can’t lift the lid on every secret your stylist has up their sleeve, we’re giving you a little more insight into how the Wella hair color charts are used. Hair lovers: consider this your chance to demystify the salon experience and, colorists, read on to brush up on the skills you’ve already expertly honed…
1. The Colour Theory
To predict the finished look of every colour transformation, colourists use a simple equation:
Hair’s starting point + colour chosen = end result
Now, you know what ‘colour chosen’ means – it’s the desired hair hue – while the ‘starting point’ is a combination of the hair history and the underlying pigment. Let’s break each of them down…
Hair History
Colourists look at the processes your hair has already been through. Has it been coloured before? How long ago? What was used? Why? These are all questions they might ask you. Even matters such as your styling routine or whether you’re a swimmer might be discussed, all in a bid to figure out what formulas will work with your locks, and whether your hair is in good enough condition for a lightener.
Underlying pigment
When hair is coloured – especially if a lightener, like Blondor, is used – some of the underlying pigments in your hair may be exposed. You’ll learn more about this below when we take a look at the Lightening Curve, but underlying pigment is an important factor when choosing a colour, too. Will your colourist work with it, or work to correct it?
2. The Lightening Curve
So, let’s venture further into underlying pigment. The Lightening Curve, seen below, is essentially a diagram that helps colourists determine the correct shade for their client’s hair.
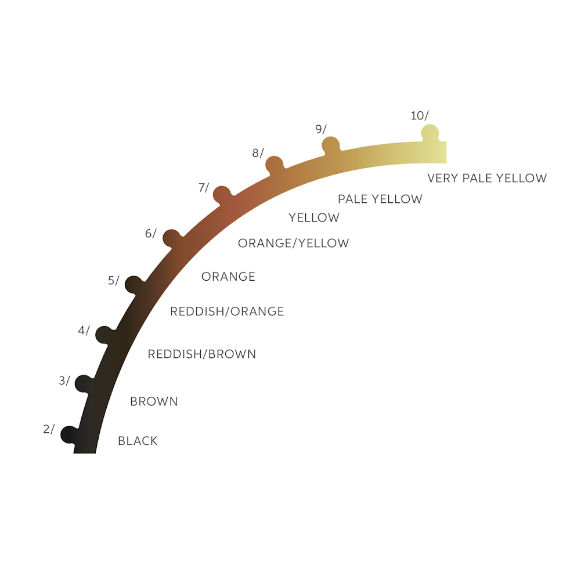
For example, if you’re naturally a deep brunette 3/ but you want to add a few subtle highlights, lifting ribbons of hair to a 6/ will alter and brighten the underlying pigment, creating the perfect base for a deep caramel toner. Meanwhile, if you’re naturally a golden level 8/ but you’re craving a platinum ‘do, you’d need to be lifted to a very pale yellow 10/, before a toner is applied to counteract the yellow. That brings us to the next step…
3. The Colour Circle
While the Lightening Curve is helpful in understanding hair depth and shade, the Colour Circle is used to figure out the toner required to complement or correct tones in the hair. It’s all based on colour theory; the understanding that colours opposite each other on the colour wheel will neutralize one another, while side-by-side colours will create a whole new hue.
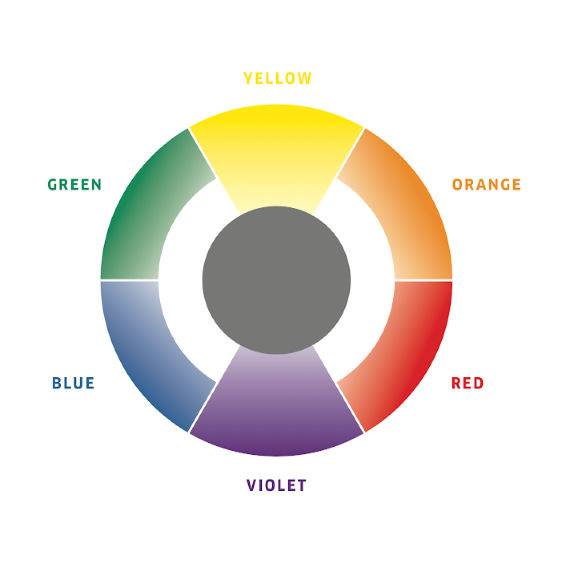
For example, if blonde hair is yellow and warm but you want it to be icy and cool, you’d look to see which colour is opposite yellow on the Colour Circle. In this case, it’s purple. Then, a little bit of violet would be added to the hair formula to counteract the yellow tones. Only a dash is needed to subtly colour correct.
4. The Numbering System
You’ve got the full lowdown on the Lightening Curve and the Colour Circle. Now, let’s look at how they correlate with a numbering system to create a hair colour formula. Wella has its own universal numbering system, which means it’s the same across all colour products, whether hair is being treated to the pure permanent pigment of Koleston Perfect, or our kind-to-hair demi-permanent, Color Touch.
Every number in the numbering system is divided by a stroke. The figure before the stroke denotes the depth (how light or dark the hair is), and the figure after indicates what colour you’ll see. When you get your hair coloured, you might hear your colourist reeling off all manner of random numbers. The tables below show what each one means, and how they combine to make the most flawless hue.
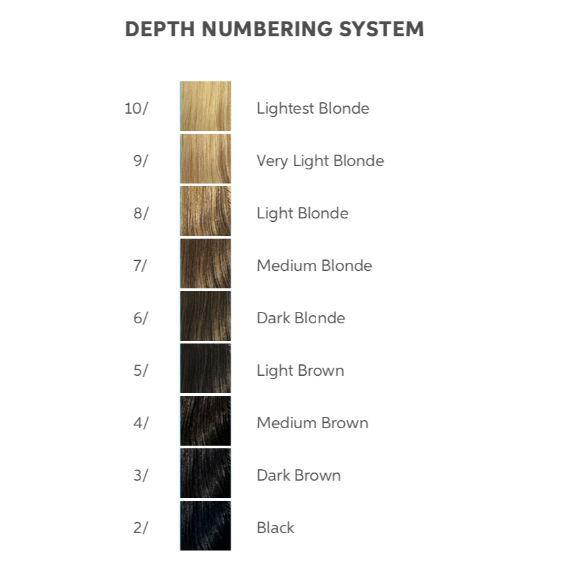
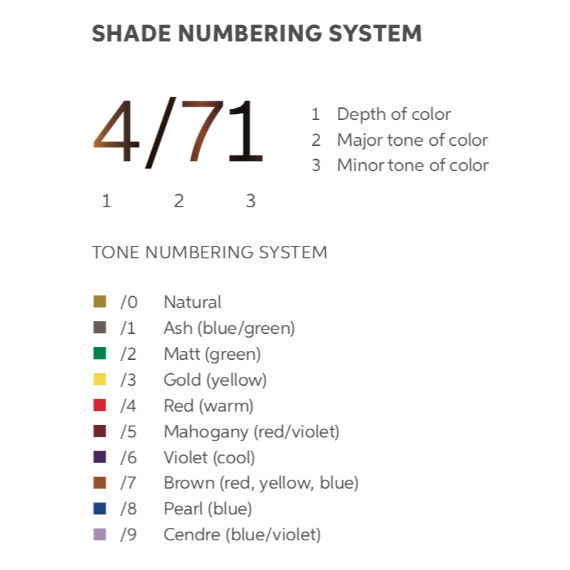
The images above showing the depth numbering system on the left, and on the right, you’ll see the tone numbering system, as well as how depth and tone translate into a shade number.
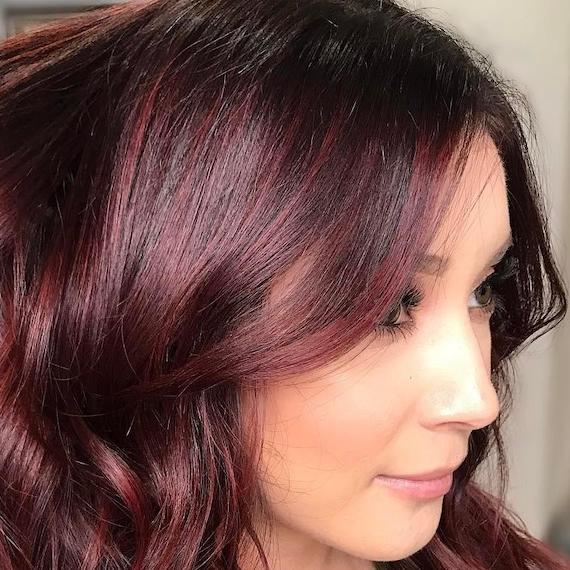
Case in point? Say you’re going for a deep mahogany hair hue like in the photos below. To achieve it, you’ll want to reach the depth of a 4/, 5/ or a 6/ then add the tone of a red-violet /5 to achieve that rich, radiant finish, depending on the undertones.
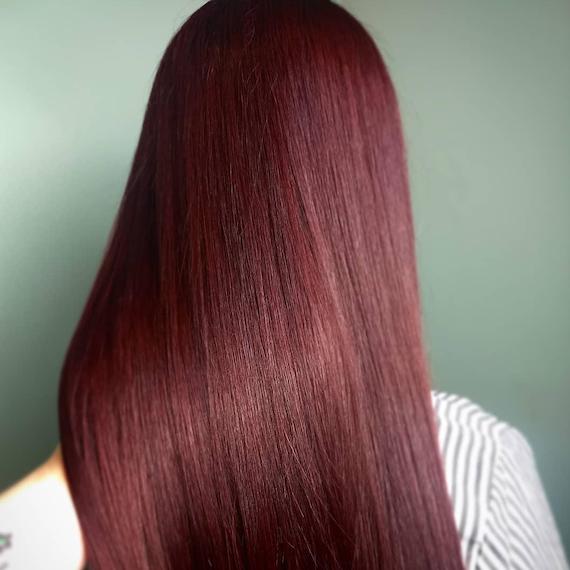
Image Credit: @cassandra_foehr
5. The Best Colour Curating Tools
There are various tools colourists might use to find the perfect blend for every client, with the most common being a colour chart or a book of hair swatches. These are helpful in the consultation stage, (combined with knowledge of the hair’s starting point) but now there’s also a digital tool that can help colourists match you to your ideal shade.
It’s called the Koleston Perfect Digital Shade Chart, and it’s an app that’s available for Android devices, iPhones and iPads. Not only does it pull up every shade available; it also allows you to see what each colour would look like in different lighting, creating a realistic hair simulation. Teamed with expert knowledge of the Lightening Curve and the Colour Circle, it unlocks a new way to identify the most beautiful colour blends.
It’s not simple, but the pros have got you covered…
Header Image Credit: @wellanordic
LEARN ONLINE
Educate yourself on the Wella Professionals learning platform
FIND A SALON
Find a salon near you with our products and stylists
SHOP PRODUCTS
Shop products for these looks on Wellastore

